Master the art of clearing lines efficiently in Block Blast. Learn advanced strategies to keep your board open, score massive combos, and survive longer.
How to Clear Lines Faster in Block Blast
Speed in Block Blast doesn't come from frantically dropping blocks; it comes from smart planning and meticulous board management. If you want to clear lines faster, achieve higher scores, and prevent early game-overs, you need to set up your board so that every piece has a clear purpose.
In this comprehensive guide, we'll dive into the core mechanics of line clearing and share advanced strategies to help you become a much more efficient player. Whether you're a beginner trying to break your high score or an experienced player aiming to master board management, these Block Blast puzzle tips will revolutionize your gameplay.
The Mechanics of a Fast Clear
At its core, Block Blast line clearing relies on completing full rows or columns of 8 blocks. The game continuously feeds you sets of three varying shapes. The key to speed is anticipating how these shapes will fit together before you place them.
If you just drop blocks randomly to fill space, you'll quickly end up with a cluttered board full of unusable holes, which completely destroys your clearing momentum. Efficient clearing means building structures that are specifically designed to accept the most common block shapes, allowing for smooth, continuous gameplay without pausing to find a spot.
Essential Tips to Clear Lines Faster
Here are the top actionable strategies to accelerate your clearing speed.
1. Leave Open "Landing Zones"
Before placing a piece, ask yourself: "Where can my next two pieces fit?" The biggest mistake beginners make is building tall, uneven towers in the center of the board. This limits where long or chunky pieces (like the 3x3 square) can go.
Instead, create large, flat areas or simple rectangular gaps. Keeping the center relatively open and pushing your structures towards the edges creates safe "landing zones" for incoming pieces. This strategy guarantees that when a massive or awkwardly shaped block appears, you can drop it instantly without ruining your board.
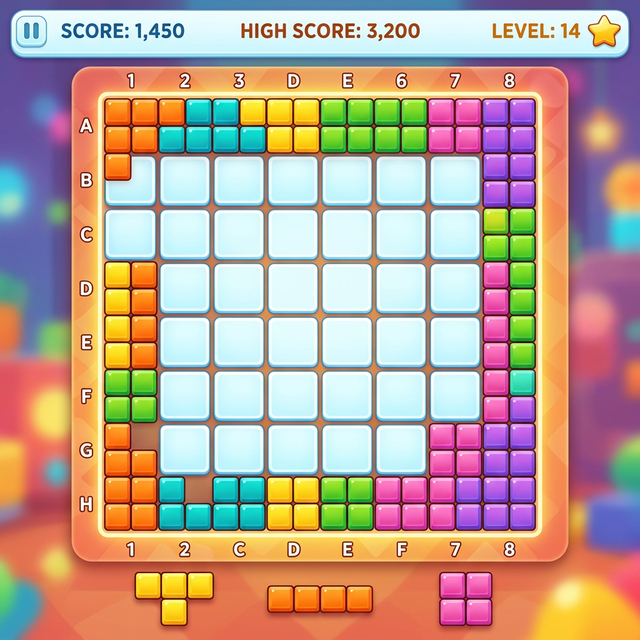 Keep the center of the board open to create multiple landing zones for any upcoming shape.
2. Prioritize Multi-Line Clears
Don't panic and clear a single line if waiting one more move allows you to clear two, three, or even four lines at once. Building for multi-line clears (combos) is surprisingly safer than clearing one line at a time because:
- It opens more space instantly: Clearing 3 lines removes 24 blocks in a single turn, massively freeing up your board and giving you a clean slate.
- It provides more options: Having a thicker row of nearly-complete blocks gives you more hook points for oddly shaped pieces.
- It maximizes your score: As covered in our combo guide, massive clears trigger huge multipliers, boosting your final score exponentially.
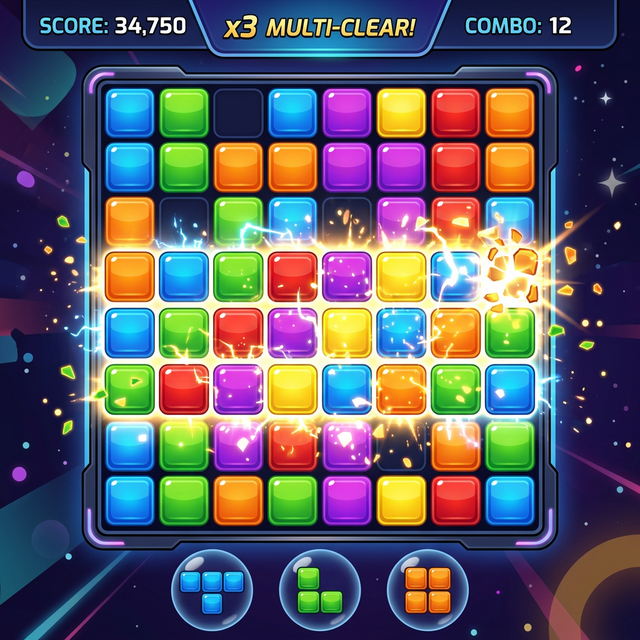 Setting up a multi-line clear cleans up the board faster and reduces the risk of making mistakes.
3. Don't Bury Single-Cell Holes
A one-cell pit buried under other blocks is the enemy of speed. It is extremely hard to fill and forces you to build awkwardly around it, slowing down all future line clears. Leaving these holes forces you to rely entirely on the rare 1x1 block.
If a single-cell hole appears, prioritize fixing it early using a 1x1 block or a strategically placed L-shape before the situation escalates. Never block the path to an open hole if you can avoid it.
4. Think 3 Moves Ahead
Fast players get into a rhythm by planning short sequences rather than just looking at the single active piece. Look at all three pieces generated at the bottom of the screen before making your first move:
- Move 1: Set up space and build a foundation. Use your worst piece first to dictate the board layout.
- Move 2: Prepare the alignment necessary for the clear using the second piece.
- Move 3: Drop the final piece to clear the lines efficiently. Practicing this 3-move rhythm reduces hesitation and keeps your game flow consistent.
Advanced Strategies for Experienced Players
Once you've mastered the essentials, incorporate these advanced tactics.
Dealing with the 3x3 and Long Blocks
The massive 3x3 square and the straight 1x5 line block are often game-enders. To clear lines faster, you must expect these blocks rather than merely reacting to them. Always designated a flexible 3x3 area—preferably in a corner—that is clean and empty. If you find yourself running out of room, aggressively clear any surrounding single lines just to free up a corner for these massive shapes.
The Corner-First Strategy
Instead of building from the center out, try building your stable blocks in the corners. The screen edges serve as natural borders, giving your block combinations more stability. When you build from the corners, the center naturally stays open as a grand landing zone, which accelerates your clearing rate immensely.
Frequently Asked Questions (FAQ)
Does clearing lines faster get me a higher score? Yes! While simply clearing a line gives you points, clearing lines simultaneously (or in back-to-back Streak moves) triggers Combos and Streaks which exponentially increase your score. Fast clears often naturally lead to these high-scoring events.
What if none of my three blocks can immediately clear a line? Don't panic. Focus on setting up future clears. Place the blocks to create flat surfaces or to close off awkward shapes, ensuring that the next batch of three blocks will have an easy drop. Focus on preserving space rather than hunting for an immediate clear.
How do I quickly deal with the massive 3x3 square block? The 3x3 block is why Tip #1 (Leaving Open Landing Zones) is so crucial. Always try to keep a 3x3, 3x4, or 4x3 area relatively clear in one corner of your board. If you see a 3x3 coming and don't have space, use your other two pieces to frantically clear a wide section first.
Is it better to clear rows horizontally or columns vertically? It doesn't matter for the score, but aesthetically and structurally, most players find it easier to clear horizontal rows while using vertical drops to trigger the clear. However, always take whichever clear requires the safest block placement.
Keep Exploring
Mastering speed takes practice, but applying these structural tips will immediately improve your game flow.
Want to boost your gameplay even further? Check out our other guides:
Last updated: 2026-02-27